Color-code your problems in Qlab
TL;DR:
Color-code cues in Qlab while they are highlighted, during your run, so you can go back to them later, using Hotkeys.
The Story:
I love books. But I hate paper when it comes to the production process. Partly because I’m a geek and want to find cool ways to do things. And partly because I work in A LOT of places and never want to be in danger of leaving my notes and scripts somewhere or have to carry them with me.
When it comes to time to run tech for a show, no matter how much you prepare, things will go wrong, you’ll want to edit your work, or the director wants to make changes. So as I run through the show in real time, I need to make notes of what cues to go back and fix, ask questions, etc.
The way I like to do this is by using colors, found on the “Basics” tab. The color Red stands out and is a classic for “Stop! There is a problem!” After I make it Red, I might also add a quick note in the Notes field (more often, though, I keep all of my notes in a Google Doc that’s open on another screen).


After the run, I can go back to the Red cues, read the notes, and make my corrections. (And perhaps change the color to Orange if I need to keep it highlighted for further observation.)
Here are the color codes I use for myself:
- Red – something in this cue needs to change; important to come back to it and edit
- Orange – changes have been made, but should be reviewed with the designer/director
- Yellow – usually an audio cue, where everything works fine but I want to tweak a level
- Blue – replace media with latest version, because, clearly, THAT wasn’t it
- Grey – this is a cue that might be getting cut, but that’s part of a larger discussion and I just want to keep aware of it
This is easy enough to do by selecting the Basics tab and changing the highlight color. But if you are in Show mode, or using other tabs…there is enough to do and watch when rehearsing and, let’s face it, making small edits while doing it.
So, the secret is writing a script that will launch a prompt to change the color – AND then invoke that with a hotkey!
The Esoteric Bit:
First, create a script cue, which I call “Color Selected Cue”. I also put in the Number field what the keystroke will be for my Hotkey, which isn’t necessary for functionality but it helps me to remember and track what my Hotkeys are. (Bet you didn’t know the Number field didn’t have to be a number, huh? Just wait until you read my post on Countdown Timers!) I also like to put in the cue name, so that I know what it is, even though I keep a separate cue list with all of my hotkeys. It’s just me being overly organized.
![]()
Now, here’s the AppleScript:
tell application id “com.figure53.qlab.3” to tell front workspace
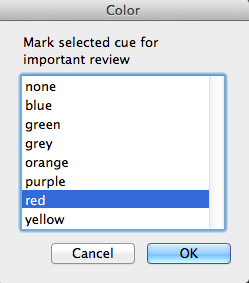
set myColor to choose from list {“none”, “blue”, “green”, “grey”, “orange”, “purple”, “red”, “yellow”} with title “Color” with prompt “Mark selected cue for important review” default items “red”
set myOSC to “/cue/selected/colorName ” & myColor
do shell script “echo ” & myOSC & ” | nc -u -w 0 127.0.0.1 53535″
end tell
There are a couple of things going on here. Once we state that Qlab itself is the target of the script, and the front workspace (in case you have multiple files open), you go on to state all the colors available. I could restrict the list to just Red, but I like to keep my options open should I want to make an extra mouse click for another color later on. Don’t like my Red example? Change the default item.
The next lines involve OSC and some programming switches, which is a protocol called Open Sound Control – language that Qlab speaks fluently. This is where the actual color change happens (notice how we “set” the parameters of the variable “myColor” and then invoke it later).
Next step is to assign this cue a Hotkey Trigger in the Basics tab, so that we can invoke the script on demand, no matter what cue list we are in:

