Archive/Bundle functions in QLab (Save your show after it closes)

TL;DR:
QLab has a function that quickly and easily archives/bundles your show, copying all of the files you used, so you can remove it from your show computer or move it to another theatre…with a caveat…

The Story:
In an earlier way-too-long post, I described my Type-A method to organizing my files as I design a show. However, things can still fall through the cracks. And that workflow may not work for everyone. So, if you want a bullet proof way to save all of your show files in one location, you can use the “Archive” feature of QLab, which copies all of your files in your show together, no matter where on your hard drive they might be hiding.

There is one thing to be aware of, if you are making your final copy of your show. It does not copy anything other than the actual files that ran your show. This means no Logic or Premier editing projects that might have been created to edit together your cue/effect, etc. Of course, it does not make a copy of any plugin effects that you may have used, but it will create a text file listing what plugins were used.

The Esoteric Bit:
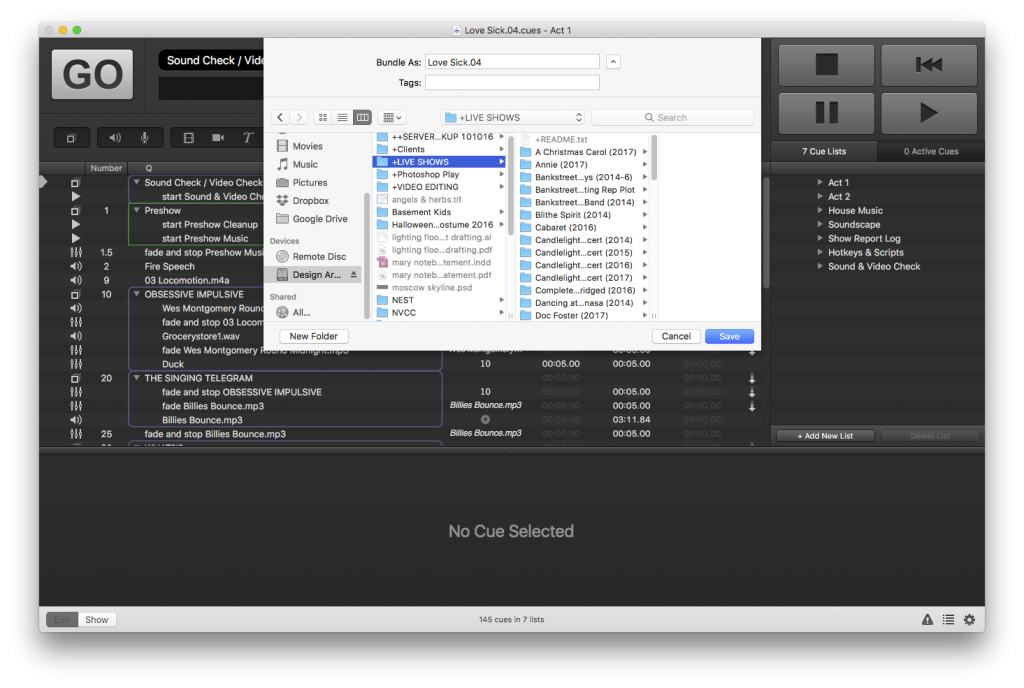
Creating an Archive/Bundle of your QLab show takes less time than reading this blog post. Open your show, and go to File>Bundle Workspace…

Choose your location – a new folder will be created based on the name of your QLab file.
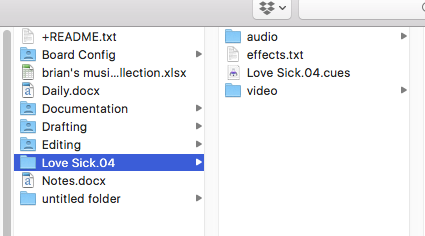
And that’s it! You’ll get a folder for audio, a folder for video, and a text file listing your plugins. Everything you used in your show.
It is important to note that this process makes a COPY of your show files to a new location. It does not delete anything.

Cheers!
-brian
Visions for your Versions

TL;DR:
Cover your assets by working with versions

The Story:
I talk a lot about Qlab on this blog, but today’s installment applies to working in any application.

I’ve always been pretty organized, even before I started using computers. (You know, before entering college in 1994…) Keeping things straight is critical to knowing where you are at in a process, right?

I am going to assume that you already know how to save files and choose where they save. (Don’t laugh, there are lots of those people out there…) In a future post I may talk about asset management; but for now I’m going to assume you have all of your files in a nice orderly folder.

You start your project, be it in Qlab, Protools, Premier, Photoshop, whatever, and you give it a file name. What do you do if you want to save a new version, in case you want to go back? If you are like many people, this opens the door to having a number of files called “name NEW” and “name NEW2” and “name THIS ONE”. This is a disaster waiting to happen. I’ve seen it all too often. I’ve even been there.

Years ago my band, Talking to Walls, was making our biggest budget record. We had an experienced producer/engineer on our project, named Greg Giorgio. While I learned MANY things from Greg, the one I want to talk about here is how he taught me to version my files.

The Esoteric Bit:
Open your program if you haven’t already, and save your file first. Always good to do that, so you don’t get working and forget to save until it’s too late. Maybe you already have a file you’ve started when you found this blog.

Regardless, I am going to name my imaginary project thus:

“My Project.00.cues” (we will pretend it is a Qlab file)

I do my work, and I save. I finish for the day, and I go home.

The next day, I am all set to continue building my show/project/recording, and so I make a copy of the file and re-name it:

“My Project.01.cues”

And so my day begins.

I could have started my numbering at one instead of zero. But as I took on this habit, I found that I wouldn’t name the first file with a number – just my revisions. To make sure everything sorted in order in my folder, I went back and added the zeros to that first file. Just how I happened to start getting into this workflow and how I kept up with it.

Regardless, every day you start working on your file, or if you are about to make some major changes, give it a new number. If you find yourself at a crossroads and want to know exactly what your restore point is, tack on a description:

“My Project.06 static.cues”

For this imaginary project I am working on, this suffix tells me that as of version 6, I replaced all my videos with still images – I’m not sure the director really knows what they want, so I am making sure I know how to get quickly back to when everything was in video format. (Actually happened to me, in the reverse!)

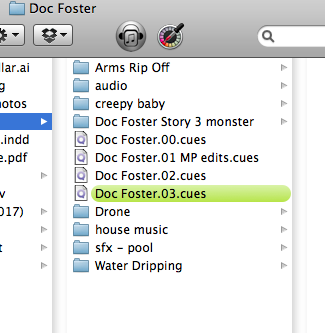
Here is an example, from a horror-themed UCONN Puppetry MFA final project called “Doc Foster’s Terrifying Tales” (amazing show, hoping it will be on tour before too long!)

The great thing is that, in most applications, you are just working with what I call control, or layout files. There is no actual media contained in your Qlab or Protools file. So it’s actually a pretty small file, and won’t add to a larger overall project folder size.

For files that I load in a live show environment, I often use the color highlight feature in OSX, and make my show files green so they jump out in the list (I might have folders or other files in my root project folder, and I want my most recent file to jump out in case I have to click it quickly.

Note:
Some applications, like Protools, will create a subdirectory based on your file name. In which case I will skip the “.00” and add it on later so I don’t screw up the folder naming. Again, always keep it clean! Additionally, in Photoshop – there is (or was, I never learned it) a feature allowing for versioning. That’s a bit deeper than most people go, and they may not know how to use it. I know I don’t…and I half expect them to take the feature away. Logic has added a feature whereby you create internal revisions…I haven’t quite figured that one out yet, and Apple’s file tree in their Pro apps is a whole other conversation.

Cheers!
-brian

Dirty Programming: Clear your Cache in Qlab

This post has been updated after a Twitter conversation with the good folks at Figure 53 got me thinking…I’ve made this much more useful as a result, so you don’t pull your whole show down to a stop.
TL;DR:
Clearing out a buildup of cues in Qlab via a script, which is a little more graceful than hitting the Panic button.

The Story:
When I started programming shows in Qlab, I really went whole hog. My first real show involved audio playback, video playback, MIDI over the network to two other machines that were also doing video playback, and MIDI commands to a light board. I was also running timers and such.

It was the Wizard of Oz – not only was it a complex show for tech, but Qlab was the only thing out there that could help me make it all happen.

So, I was still learning and, looking back, made what were sloppy programming errors that led to the need for this script. You see, I had videos stacking up (probably forgot the “Stop on Fade Out” check box a number of times) and it was stealing system resources. So I needed a “Clear Cache” command that would run at certain times to just get rid of the junk still running, and not require me to remember hitting the Escape key.

This is an example of sloppy programming on my part, but I put it here in case it may be useful for someone.

The Esoteric Bit:
Once again we create a Script cue. I call mine “CLEAR CACHE” – in all caps because when it hits, it’s gonna wipe the board and I want to be sure I want it there. It’s like capitalizing the word blackout – not something to take lightly!

Here is the script:

tell application “QLab 3”
set cueList to current cue list of workspace 1
set mySel to cues of cueList
repeat with myCue in mySel
if running of myCue and q type of myCue is not “Script” and q number of myCue is not “4” then
stop myCue
end if
end repeat
end tell

Now, pay close attention to where it says “and q number of myCue is not “4”. Replace this number with a cue that you want to keep running. In my original show, I had a lot of video cues stacking up behind my current cue – I couldn’t see them, but they were all running. So by specifying a cue number to leave running, I could stop all of that in the background, and no one would notice (everything was a full-screen image in that show).

If you want to just stop everything, then take out that part entirely.

Now, insert this in your cue list wherever you end up with a build up of gunky cues. Of course, the proper thing to do would be to hunt down what is happening and actually fix the problem. But everyone is different, and in the run up to tech for the show, you might have some dangling ends that you want to deal with later.

I’m not saying you’re sloppy if you use this script. I’m just saying don’t be sloppy and use this script.

Cheers!
-brian

PS – In my conversation with Figure 53 that led to this update, their original suggestion was to just create a Stop Cue that targets the Cue List in question. No scripts needed. Well, that’s pretty easy and much neater! I originally wrote this script years ago, on my first Qlab show. I didn’t really know what I was doing, and clearly over-engineered a solution. However, this got me thinking about my original problem, which is why this script now allows you to leave some cues running while stopping all the rest. Teamwork!

An Occasional Midsummer Night’s Dream (David Bowie)

The director chose this as an ensemble piece. It was for tech, too!

February has fallen into a pattern over the past few years. It’s when things start picking back up from the quieter January. The gradual changeover between maintenance, and repair throughout the theatre leading into prep for my usual season of shows coming up. At NVCC, my home theatre department, we usually have our Spring shows in April, so there is time to design and plan, while also getting in a few shows at other theatre companies in the meantime. But, due to some schedule changes, our big Spring show landed at the end of February. It felt like an odd time to put up A Midsummer Night’s Dream.

For this show, I wanted to give my students as much of the reigns as possible – and after our strong productions last semester on “Laramie Project” and :”Next to Normal,” I thought it was high time to let them run things. This gave me an assistant designer (Kaden Dupont) and a system engineer (Chris Varanko), who worked from my overall vision. We all hauled speakers and programed and filled out spreadsheets – but I was able to let them take the lead (which was good, since I ended having conflicts a couple of days and needed them to take charge). We wrapped the show with me feeling very proud of these two – we’ve done a few shows together now as a trio (and Chris and I have had many before that!) and they really came to the table with their own ideas and abilities. I’ve been extremely lucky to have them both, since they’re going to be graduating soon – next year is going to be a year of rebuilding, but we have some great minds coming up the ranks that I look forward to working with.

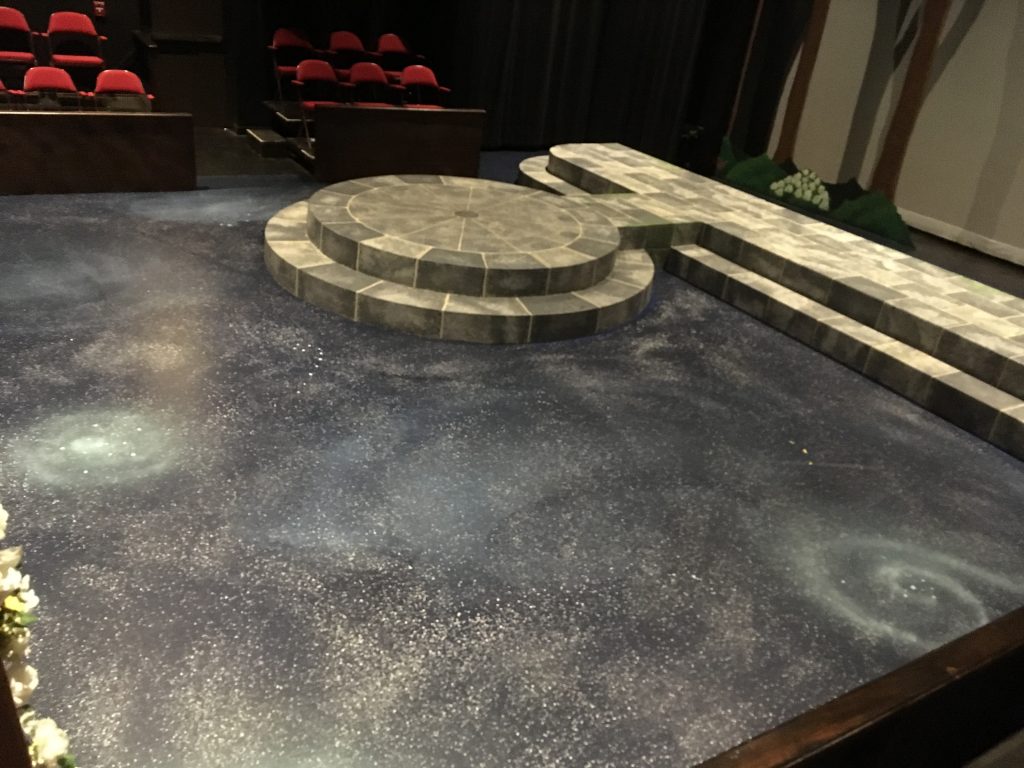
So, what did we use all of that fire power for? Hasn’t Midsummer been done to death? What new things could we offer? Our director, Sasha Bratt, wanted to present a magical world where anything could happen. So I said “How about pinning the design on the work, and artists influenced by, David Bowie?” Obviously, I was thinking from a sound design frame of mind, but the idea caught fire with the costume designer and Bowie fan Lisa Bebey, and I read Bill Cone’s floor treatment as Sasha’s love for “Starman” (coincidence I’m sure, but I’m taking it).

This led to a few weeks of design time, building loops and stings from a wide library of music. For most of the show, I wanted to steer away from vocals, and keep our music instrumental (though to start the show I found a stunning a capella cover of “Sweet Dreams” by Holly Henry online that I edited to suit my needs). The problem with using such an iconic artist was that there are so many hits, and I wanted to avoid using those big radio hooks, so that we wouldn’t pull people out of the world the show was creating. That guideline, and working with a lot of his 90’s material, put us in danger of “designing a Bowie-themed show without any Bowie,” since casual fans wouldn’t recognize anything for a while once “Starman” wrapped up the house music.

But Kaden and I worked away, sampling bits here and there and blending in effects and other samples to mould the material to what was needed. Songs like “Blackstar” are so involved and intricate, and have so many beautiful themes happening over it’s 10 minute length, ; the only way I could build one of the loops I wanted was to bathe the sample in long delays and reverbs, which made the song sound even more confusingly haunting as it circled in on itself, ouroboros-style. Other songs, like “Dollar Days,” “Pallas Athena,” and “The Wedding” are deep catalog dives that have so much rich texture that we augmented with chimes, cymbals, and more as we built out our loops.

Of course, one of the most obscure songs from the David Bowie catalog that we sampled was the first track from his first, oft-forgotten self-titled album, a song called “Uncle Arthur,” which was the theme for the Mechanicals, the players who perform Shakespeare’s quintessential play-within-a-play. First hearing this song made me realize a) “I have found the perfect music for these clowns,” and b) “I am not surprised that this has not achieved the status of anything from, say, ‘Aladdin Sane’.” It was perfect and adapted well to the pitch bending I applied to it.

There was a random bit of song that one of the actors started singing in rehearsal, and the director wanted to keep it in the show. Titania gets lulled to sleep by one of the fairies (Jalon Coplan) singing Leonard Cohen’s “Hallelujah” – a classic song by one of my favorite writers, but how could we do something fresh with one of the most covered songs of all time? How could we make it work in our world? I was trying to steer towards non-literal sounds where I could (the hunting horns at the end of the show were chopped up, effected samples of didgeridoo, for example). The answer was in having my friend Ryan Fedak, one of Mary’s former students who is up at the Berklee College of Music, record a sparse vibraphone backing track and send it to us as tech started.

Kaden had a few key contributions to the design – the recurring lovers theme between Lysander and Hermia was lifted from the Sword Art Online Soundtrack, a beautiful violin piece called “At Nightfall.” It starts off with this beautiful, recognizable sweeping riff, which we were able to play to great comic effect in one of the scenes. By utilizing a couple of hotkey triggers in Qlab we react to the actors on stage in a dynamic, rather than rehearsed, fashion. This gave us the sound design we wanted while giving the actors room to develop the scene night to night.

Working closely with an assistant designer was a great teaching opportunity – instead of having to direct the minute details of what I wanted, I knew I could trust her to take the guidelines I set out and for her to take that to new places (and find songs from artists like Godspeed You Black Emperor). I taught her how to create random soundscapes using Qlab’s random group setting, a trick I learned in turn from designer Matt Hubbs when we were on “Indecent.” We used random soundscapes throughout the show, including Puck’s Theme, which was based around Nine Inch Nails’ track 6 Ghosts, from the first disc of their 2008 instrumental experiment Ghosts I-IV. For that segment, we used a collection of reversed cymbal samples, which were spread throughout the theatre, to make it even more haunted and twisted.

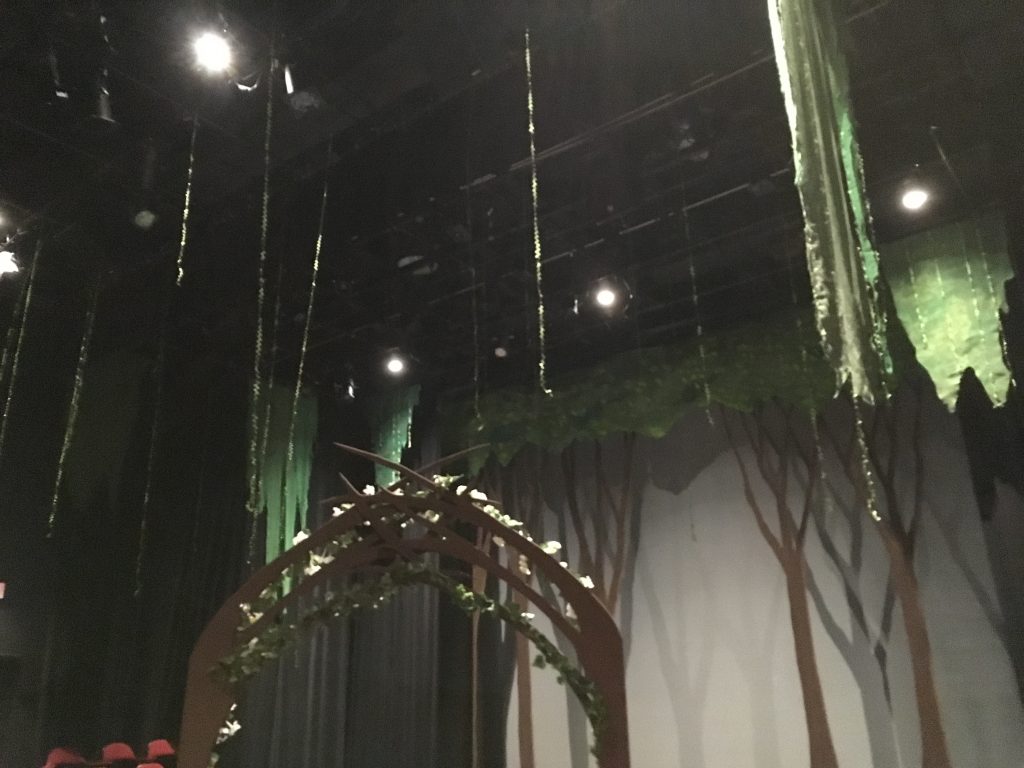
Bad phone photo of what was an immersive set.

“Spread throughout the theatre” was the challenge I posited to Chris to figure out as the system engineer. I had ideas of what would essentially be quadrophonic sound for the audience in a 3/4 thrust black box space, with subwoofers added. Ideas like “Oberon, king of the fairies, enters, and samples of his name being whispered by cast members start faintly ping-ponging around the room, under the music.” Between managing assets (we were overhauling the main stage PA system across the hall the same week of load in) and working with the director to find a common ground (speaker placements, actor blocking) I gave him a stated goal and references, letting him sort out the details and do the documentation, supporting him as questions came up.

Overall, it was a very ambitious design, and we were able to pull it off thanks to teamwork. I would be running playback from the tech table in rehearsals, editing Qlab on the fly (combining Nine Inch Nails lilting dirge “Something I Can Never Have” with Bowie’s chugging “All the Madmen” over thunderclaps, depth charges, delays & reverbs, and finding the right amount of brand new subwoofer borrowed from next door), while Kaden was working in my office revising a random soundscape and editing Chris’ new actor voiceovers as they came in, which he was sampling from the green room.

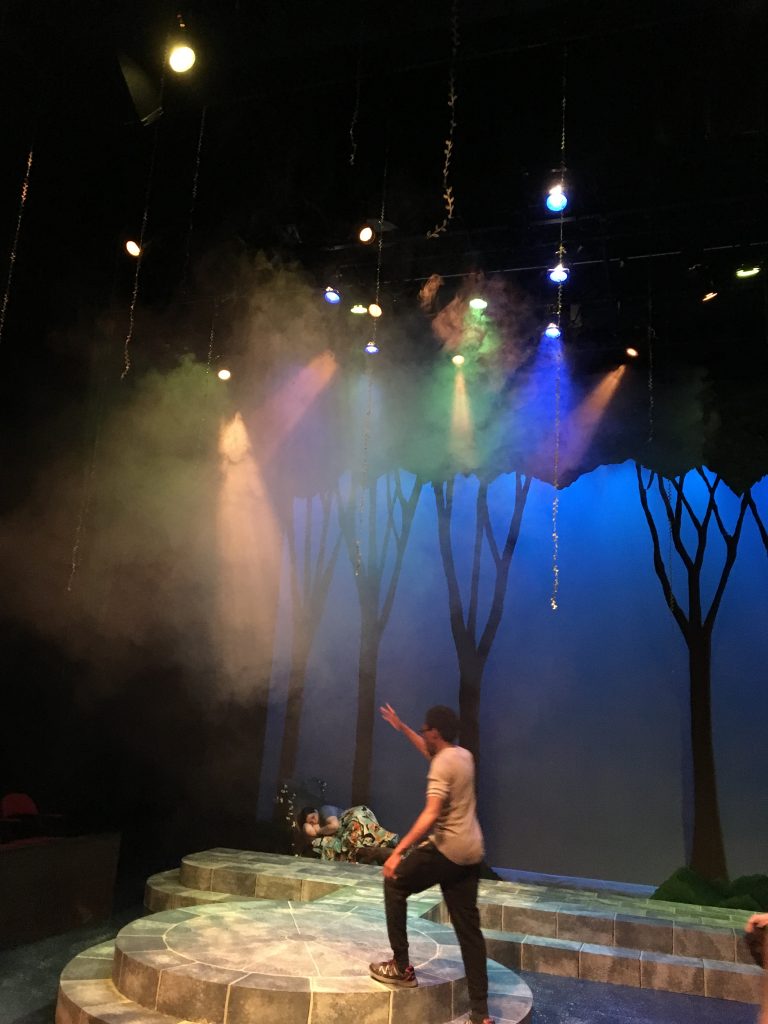
Blocking rehearsal

We all had a lot of fun. The cast was amazing – one of the best college shows I’ve ever worked on (that’s a lot of schools and shows). I was really sad when I found out that we weren’t able to extend the run due to schedule conflicts. The enthusiasm and commitment I saw – in my department and all of the others – reinforced my choice for music at curtain call. I re-edited a joyous song from Mika called “We Are Golden” to the length we needed (and the final bow ended right on the button, every time! Long reverb tails for the win!):

“Teenage dreams in a teenage circus
Running around like a clown on purpose
Who gives a damn about the family you come from?
No giving up when you’re young and you want some”

For a list of songs we sampled, check out this link:
https://drive.google.com/open?id=1QZ0ws-mFHlIMcnovLg0cfUA8gH-07RNFOMtOAS2u4MI

-brian

(Our lighting designer, Jon Curns, shot real photos of the show. I’ll come back and update this post when I get them.)

Color-code your problems in Qlab

TL;DR:
Color-code cues in Qlab while they are highlighted, during your run, so you can go back to them later, using Hotkeys.

The Story:
I love books. But I hate paper when it comes to the production process. Partly because I’m a geek and want to find cool ways to do things. And partly because I work in A LOT of places and never want to be in danger of leaving my notes and scripts somewhere or have to carry them with me.

When it comes to time to run tech for a show, no matter how much you prepare, things will go wrong, you’ll want to edit your work, or the director wants to make changes. So as I run through the show in real time, I need to make notes of what cues to go back and fix, ask questions, etc.

The way I like to do this is by using colors, found on the “Basics” tab. The color Red stands out and is a classic for “Stop! There is a problem!” After I make it Red, I might also add a quick note in the Notes field (more often, though, I keep all of my notes in a Google Doc that’s open on another screen).

After the run, I can go back to the Red cues, read the notes, and make my corrections. (And perhaps change the color to Orange if I need to keep it highlighted for further observation.)

Here are the color codes I use for myself:

  • Red – something in this cue needs to change; important to come back to it and edit
  • Orange – changes have been made, but should be reviewed with the designer/director
  • Yellow – usually an audio cue, where everything works fine but I want to tweak a level
  • Blue – replace media with latest version, because, clearly, THAT wasn’t it
  • Grey – this is a cue that might be getting cut, but that’s part of a larger discussion and I just want to keep aware of it

This is easy enough to do by selecting the Basics tab and changing the highlight color. But if you are in Show mode, or using other tabs…there is enough to do and watch when rehearsing and, let’s face it, making small edits while doing it.

So, the secret is writing a script that will launch a prompt to change the color – AND then invoke that with a hotkey!

The Esoteric Bit:
First, create a script cue, which I call “Color Selected Cue”. I also put in the Number field what the keystroke will be for my Hotkey, which isn’t necessary for functionality but it helps me to remember and track what my Hotkeys are. (Bet you didn’t know the Number field didn’t have to be a number, huh? Just wait until you read my post on Countdown Timers!) I also like to put in the cue name, so that I know what it is, even though I keep a separate cue list with all of my hotkeys. It’s just me being overly organized.

Now, here’s the AppleScript:

tell application id “com.figure53.qlab.3” to tell front workspace
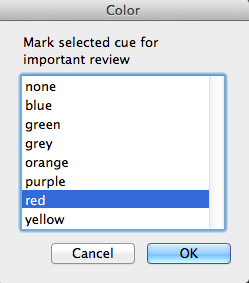
set myColor to choose from list {“none”, “blue”, “green”, “grey”, “orange”, “purple”, “red”, “yellow”} with title “Color” with prompt “Mark selected cue for important review” default items “red”
set myOSC to “/cue/selected/colorName ” & myColor
do shell script “echo ” & myOSC & ” | nc -u -w 0 127.0.0.1 53535″
end tell

There are a couple of things going on here. Once we state that Qlab itself is the target of the script, and the front workspace (in case you have multiple files open), you go on to state all the colors available. I could restrict the list to just Red, but I like to keep my options open should I want to make an extra mouse click for another color later on. Don’t like my Red example? Change the default item.

The next lines involve OSC and some programming switches, which is a protocol called Open Sound Control – language that Qlab speaks fluently. This is where the actual color change happens (notice how we “set” the parameters of the variable “myColor” and then invoke it later).

Next step is to assign this cue a Hotkey Trigger in the Basics tab, so that we can invoke the script on demand, no matter what cue list we are in:

In this case, I’ve used Control+M (to “Mark” my cue) but you can use anything you want. But make sure to go through your Qlab preferences to make sure you aren’t using something that is already reserved.
So, now select any cue in any cue list, and press your hotkey trigger – you’ll see this:
Hit Enter or click OK and poof, your cue is Red! Using another color, like “Blue to replace media” or “None to remove the color because all the changes were approved” is easy – just click on that color before hitting OK.
As a side note, I think I tried making the color names title case, with the first letter capitalized, and it didn’t work. It messes with the AppleScript syntax.
There you have it – keep up with notes as fast as your director changes their mind!
Cheers!
-brian

QLab licensing, costs, and what it all means

TL;DR:
A primer on what you have to pay for – and what you don’t. And how it’s more affordable to use QLab than you might think.

The Story:
We have all been there. People use iTunes and Keynote (or, gasp, PowerPoint!) for a live production, because they don’t know what’s better out there. (That’s why you’re reading this, eh?) Well, you have a Mac, and you want to get started with QLab, but what version do you need? And what about the budget?

The Esoteric Bit:
First off, Figure 53, the company behind Qlab, has unlocked even more features in the free version of QLab, so there is even less reason for you to not be using it. And still, before you ask, no, there is not a PC version.

The program has three areas of capability: Audio, Video, and Lighting, and can cost you anywhere from Free to $999.00. It all depends on what you need. A handy chart is provided by Figure 53 here: https://figure53.com/docs/qlab/v4/general/features/

FREE VERSION OF QLAB: Are you a school or a band playing back simple stereo files over the headphone output of your computer? Get rid of iTunes and embrace the control, editing, fades, and volume adjustments QLab has to offer, for free! You also get one basic screen of video, remote control via the iOS app, and some minimal DMX addresses for lighting.

$399 LEVEL: This is where you start to get the full capabilities…for ONE department.

  • If you need 64 audio outputs and be able to use plugins for live, on-the-fly processing, buy the Pro Audio License.
  • Maybe you’re doing some projection mapping or playing back on multiple screens, need plugins for real-time effects, image warping/keystone correction, edge blending, etc, you’ll want the Pro Video License.
  • New to Version 4, Lighting is now a major component of QLab. The Pro Lighting License gives you unlimited DMX addresses, instead of 16 with the other versions.
  • All of these Pro Licenses include the basic free features, obviously, but they also step you up into being able to work with MIDI, OSC, Scripting, Network Cues, work with Timecode, and use more advanced controls like Pause, Devamp, Arm & Disarm, and more.

RENTAL: Boy, here is a progressive software plan. Sure, even $399 is more than you might be able to spend/budget for. But you can even rent Qlab – for as little as $4/day! All the power and options – for less than a sandwich. It’s easy, and you can plan your rental dates in advance. With this, you can set up your show, get as far as you can get with the Free version, and then rent the full version for just the days you need it.

Recently, the company has introduced a login-driven, web-based system. In the past, you paid money for a license file, which would unlock the program features that you needed.  Now they’ve done away with that, presumably to reduce piracy and lost files (I’ve seen more than one company legitimately say “we paid for QLab, but we lost our license file when we upgraded or the last designer left”).

Legacy Versions and Computers: The great thing is that each license of Qlab ALSO unlocks the version below it, which is convenient for legacy machines (a version 4 license allows you to use version 3, for example). Limited budget with only an old-but-stable computer to use? This is for you. It can be hard to kill a Mac, so plenty of theatres have old ones lying around. While I can no longer find downloads for v2, you can try older versions that might work with your machine by downloading them from here: https://figure53.com/qlab/download/archive/

Cheers!
-brian

Aggregate Audio Interfaces in OSX (to use in Qlab, of course!)

TLDR:
Combine audio hardware interfaces into a singular virtual device.

The Story:
As the head of sound and video for the theatre department at NVCC, I often will bring my own gear in for use in the show. It’s a learning-and-sharing thing for everyone involved, including myself. But it can also be a bad habit, as I bring in thousands of dollars of equipment that I am then liable for. For our production of A Midsummer Night’s Dream this week, I challenged myself to not bring in my personal equipment but still have an ambitious design. The big hurdle was not to use my $1200 8-channel audio interface. Instead, we used the Mac Pro’s headphone output and two USB headphone interfaces, that probably costs $20-$30 each.

USB headphone device

Sound quality was fine – but that meant I had three audio interfaces for a total of six outputs, and Qlab can only send to one interface at a time. This was where I learned about Aggregate Audio Interfaces – all three could be combined virtually as one, and seen as such by Qlab!

(If the idea of an external, multi-channel audio interface leaves you scratching your head, we’ll be covering that in a future post.)

The Esoteric Bit:
In OSX, fire up the Audio Midi Setup, which is a control module you should become familiar with if you do enough audio work. It is located under Applications/Utilities, or you can hit Space-Command and type the name in Spotlight.

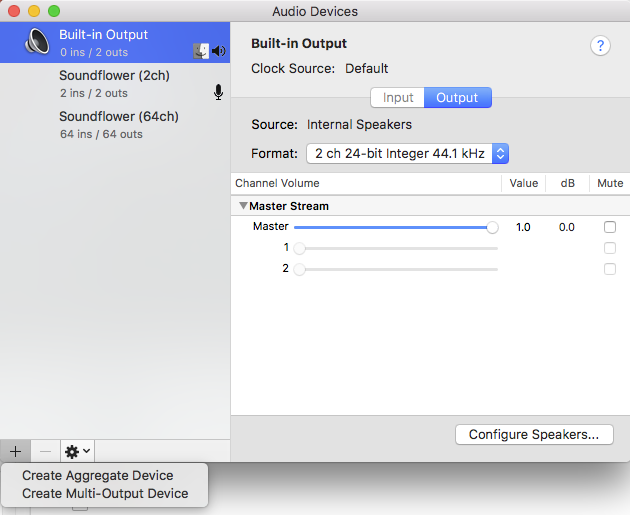
Make sure you are looking at the Audio window, not the MIDI window. You can call up each one under the “Window” menu at the top. Here you can see all of your audio interfaces that are installed, and how many channels they are of In/Out. Click the Plus icon on the bottom to create your new Aggregate Audio Device, which will combine some of the already listed devices:
Audio MIDI Setup in OSX

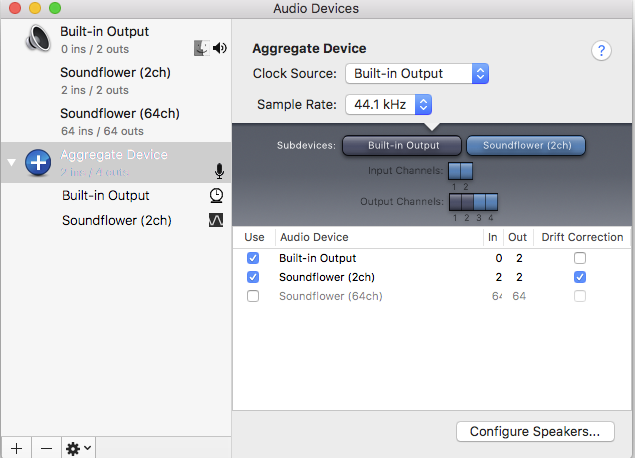
Next, you will be presented with your new virtual device, and allowed to choose what to add to it:

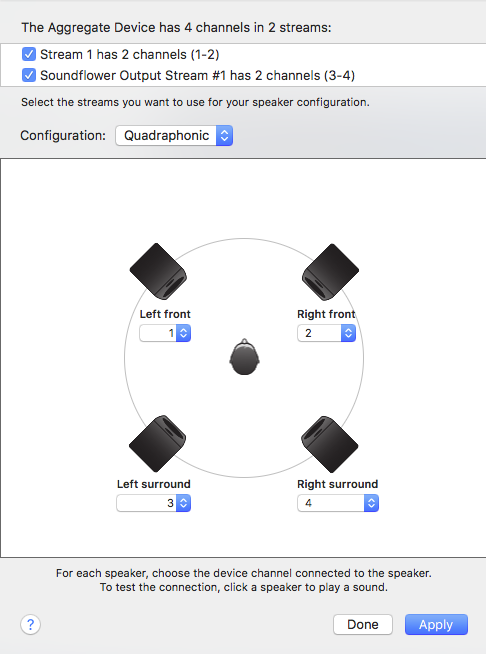
Lastly, click “Configure Speakers” – this is where you can choose how the OS will view your Virtual Device. I wanted to have 4 separate outputs, so I chose Quardrophonic (which was actually how I was using this device – two rear fills were located behind the audience for spacial effects).


Clicking on each speaker will play white noise through that speaker, so you can actually check that things are patched, as far as the OS is concerned, correctly. I wouldn’t use this for soundcheck, but to check that the operating system is working properly, this is a great feature (that I found out by accident and startled everyone in the room)!So there you have it – I left my 8-channel, $1200 audio interface at home, and used a few tiny USB audio devices that were kicking around/inherited by IT.

Cheers!
-brian

How long is this Qlab Playlist?

TL;DR:
Calculate how long a list of songs is in Qlab.

The Story:
In my early days of sound design, I would play my house music in iTunes. What could be easier? It was a drag and drop interface I knew well, and people who weren’t me could also control/change it. Of course, as I cultivated the audience’s experience more and put more time into my playlists, I switched to playing even this music in Qlab. This gave me so much more control. However, the one thing I missed was the bottom of the iTunes window giving me the length of my playlist. The House is supposed to open 30 minutes before the show starts – but what if we have to hold the start of the performance? Will I have enough music? I needed to restore this functionality, and here is how I did it.

The Esoteric Bit:
Create a script cue, and call it “<HK> Total time of selected cues”. The <HK> part of it is a visual indicator that I use, to tell me that the cue is invoked via a hotkey trigger. I also put in the Number column what that hotkey will be, as a reminder.

In the script tab, enter the following code:

tell application id “com.figure53.qlab.3” to tell front workspace
set totalSeconds to 0
set thisSeconds to 0
repeat with eachCue in (selected as list)
try
set thisSeconds to (duration of eachCue)
set totalSeconds to thisSeconds + totalSeconds
end try
end repeat

set h to totalSeconds div 3600
set s to totalSeconds – h * 3600
set m to s div 60
set s to s – m * 60

if h < 10 then
set h to text -2 thru -1 of (“00” & h)
else
set h to h as text
end if

if m < 10 then set m to text -2 thru -1 of (“00” & m)
if s < 10 then set s to text -2 thru -1 of (“00” & s)

set prettySeconds to (h & “:” & m & “:” & s)

display dialog “The total time of the selected cues is ” & prettySeconds with title “Total Time” with icon 1
end tell

There is a lot happening there under the hood. Suffice it to say, it’s adding up the length of the audio files in question.

Under the Basics tab, assign a hotkey trigger. It can be whatever you want, but remember to avoid anything already assigned in Qlab’s preference panes.

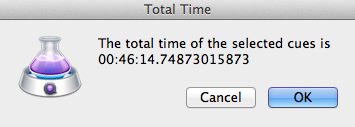
To execute the script, highlight all of the songs you want to add up, and then hit the hotkey you programmed. You’ll get a popup like this:

And now you know if you have enough music to cover the time the doors open to show start, or intermission, whatever. As I have written about elsewhere, I have a number of these types of hokey scripts that I use, and I keep them in a separate Cue List so I can refer to them and keep them out of my way in the main Cue List.

I would like to give special thanks to designer extrordinare Mic Pool and the community at the Qlab Users Group (https://groups.google.com/forum/m/#!forum/qlab), who developed the script. I don’t remember exactly who did, but they get the credit for the coding part. I just worked it into my workflow, that I am sharing here!

Cheers!
-brian

Get your computer off the Internet during a show

TL;DR:
Writing a script in Qlab that will turn on or off your computer’s wifi, so you don’t have to remember to do it.

The Story:
Most people agree that your show computer should not be on the Internet – either because of downloading applications or updates that will impair your workflow, or because your computer may do things in the background and use system resources you might otherwise need. Macs can be a lot better about viruses from the Internet than PCs are, but the fact remains that if you don’t need the Internet for your show, you might want to stay off of it.

Sometimes, turning off the wifi is what you need in order to accomplish this. This script does it for you, so you don’t have to remember. Reversing the script will also enable your wifi – either after the show so you don’t forget, for XYZ reason, or to perform some function (like my automatic emailing the stage manager a show report of times that were generated in the course of the show).

The Esoteric Bit:
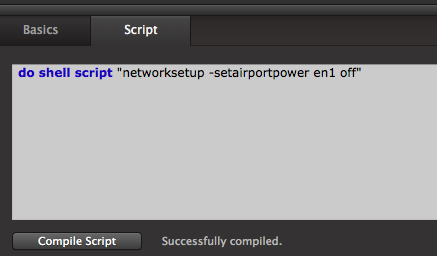
Once again we rely on an AppleScript to perform this function. I have created here two commands – one “On” and the other “Off.”

The script itself is as follows:

do shell script “networksetup -setairportpower en1 off”


If you want to turn the wifi radio on, just change the word off:

do shell script “networksetup -setairportpower en1 on”

There is more to preparing your computer for live shows than turning off the wifi, but this is one part of it and this script may help. Combine it with a cue and you’re good to go!

Cheers!
-brian

DVD player control within Qlab

TL;DR:
Use Qlab to play physical DVDs

The Story:
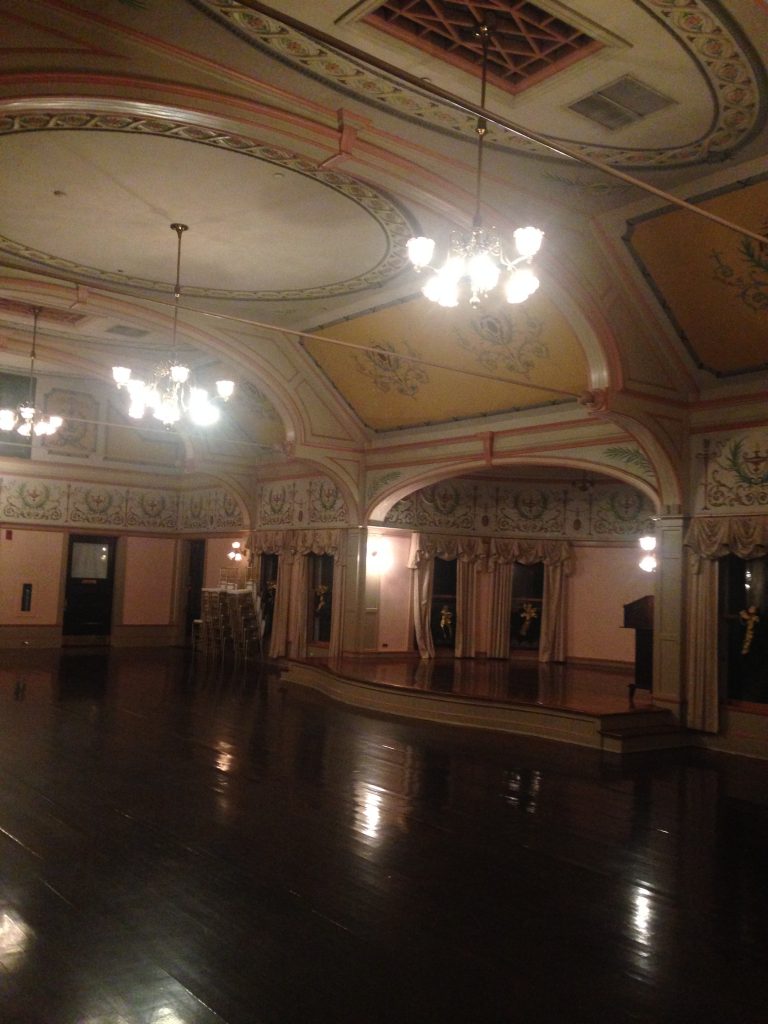
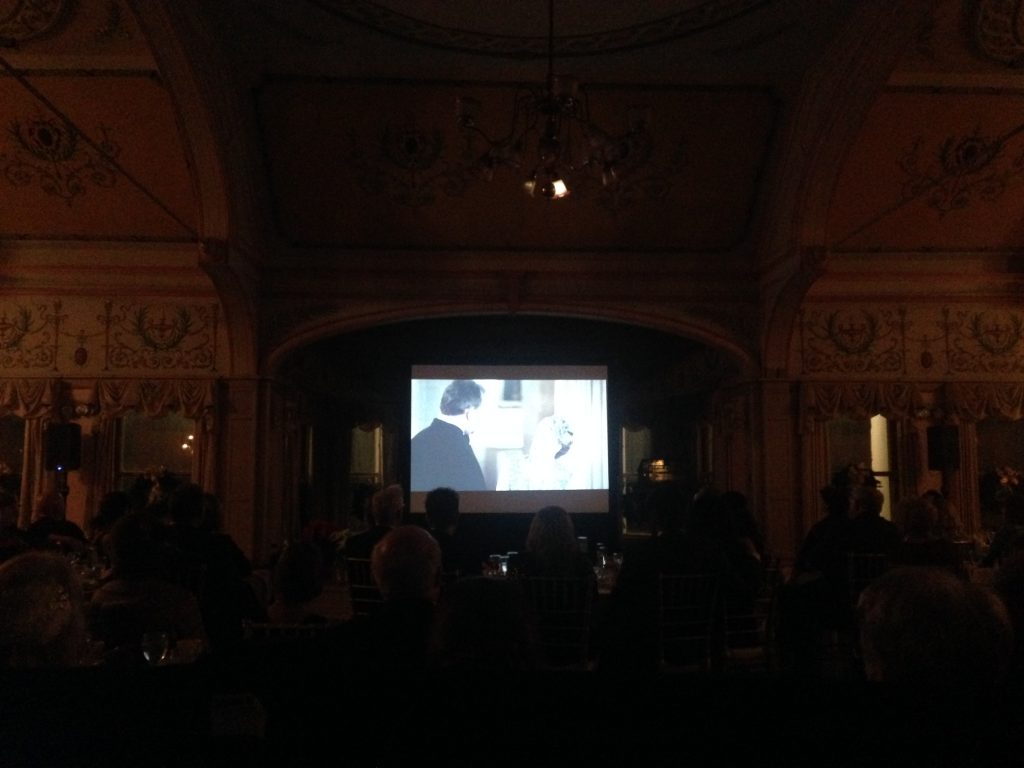
I was called in to be the lead video for a small event, located in a beautiful, historic ballroom. It was the preview screening of a very popular television show’s final season, so I was pretty into it, all things considered.

This was the hall before load in.

I arrived to find a pile of road cases and gear. It took three hours or whatever to set everything up, between the screen, the projector elevated on truss, two PA speakers, multiple DVD players, a video switcher, a bunch of screens, a PC laptop or two, and some other mystery video box that I can’t recall right now. And a mile of cable.

Once we were all up and running I thought about what we were actually doing. There was I think an iPod connected for music during the dinner, one promotional video on a DVD, and then another DVD with the episode to be shown. I think the promo commercial DVD also had a second clip to show after the episode.

DVD
I thought to myself, “this seems like way too much gear to do something really simple…and I love gear!” I wondered how I could replace all of the gear on our tech table with a single Mac laptop with an optical drive, running Qlab.

The first thing to consider was I was brought on as lead video tech. Which meant I showed up at the same time as the gear, but no consultation on what was needed or even told what I was going to be given to work with (rude, I know). So, obviously a tiny bit of planning would be needed. Sometimes you can’t get the content ahead of time. Or, in this case, the client might not want people ripping/getting soft copies of their content, to control leaks. Or to get a full quality long-form video, it’s not always feasible to leave the physical media.

Let’s see how we can do this. For the smaller commercial videos, either request in advance for files, or rip the DVD.

The latter is a safer bet – no worrying about pesty codecs (we’ve all had someone promise a video file only to get – ick! – a Windows Media Avi that we have to convert with MPEG Streamclip. I like to use Handbrake to rip my DVD content, because it works, is free, and is flexible in output. Getting to the gig in time would leave me plenty of opportunity to rip a couple of 5-8 minute commercials.

So, we set up a cue list for house music (see my future tutorials if you need to work with iTunes, Spotify, whatever, if MP3 files aren’t your thing) and a cue list for our videos and show control. Great – just like any other show. But what about the main feature?

The Esoteric Bit:
What we are going to do is insert the DVD into the drive, and then control the OS X DVD player from Qlab via AppleScript.

We will create five script cues, for Launch, Play, Pause, Stop, and Quit commands.

“Launch DVD Player”

tell application “DVD Player”
–use the following two lines of code if Qlab is to open application. Faster response to pre-open the application prior to show.
open
delay 2
set viewer full screen to true
end tell

It is better to open the DVD application during your sound/video check and pre show scripts, so that it is ready and waiting for you on cue. Always best to check! This used to be part of my “Play” script until I moved it because I was never going to use them together anyway. The “Delay” command is because it takes time for the app to open before it is ready to receive the next command. YMMV.

“Play DVD”

tell application “DVD Player”
set viewer full screen to true
play dvd
end tell

I repeat the full screen command, just to make sure it is actually in that state, in case other output or commands have messed with it or taken focus during the show.

“Pause DVD”

tell application “DVD Player”
pause dvd
end tell

“Stop DVD”

tell application “DVD Player”
stop dvd
end tell

“Quit DVD Player”

tell application “DVD Player”
quit
end tell

These last three scripts are self explanatory.  Move each of these scripts wherever you need them in your run of show cue list, and you’re now integrating your physical DVD in with the rest of your Qlab programming!

Now for the caveats that I should mention… First off, every live rig should have some sort of backup of critical components. This is all basic live engineer stuff, and I leave it up to you to sort out how that gets made. Moreover, there is the possibility of HDCP errors. If the content you are playing is copy-protected, and passing via a digital signal, it might not play on some external video setups. It may play fine on your laptop screen (primary use) but it may not view on an external monitor. It relates to HDMI encryption (or whatever spec you are using) and it’s outside the scope of this post. Basically, it’s what is supposed to keep you from running your own movie theatre with a DVD you bought with a home-use license.

The other issue is that Blu-ray, on Macs, is a whole other beast. I may tackle that in a different post in the future. But you can probably hack the above into something that works.

It also bears mentioning that some stand-alone DVD and Blu-ray players are networkable. I am working on some scripts that will let you control those via Qlab, for a future article.

Cheers!
-brian